User:OrenBochman/Cleaning Up
- For more about image cleanup in general, see Commons:Images for cleanup.
Interference or other regular patterns overlaid on an image can be introduced by a variety of sources, including:
- Electromagnetic interference in the environment of the device collecting the image;
- Noise in a transmitted image such as a television still due to analog transmission interference or degradation of media;
- The texture of the paper that the image was printed on, particularly if it was printed in a cheap magazine or newspaper.
Attempting to remove these by ordinary image space techniques such as replicating the pattern and subtracting it would be extremely difficult and unlikely to be completely successful. Sometimes interference can be hidden by downscaling or blurring, but this is rarely a satisfactory solution. Sometimes convolutions can be used, but this is an advanced technique.
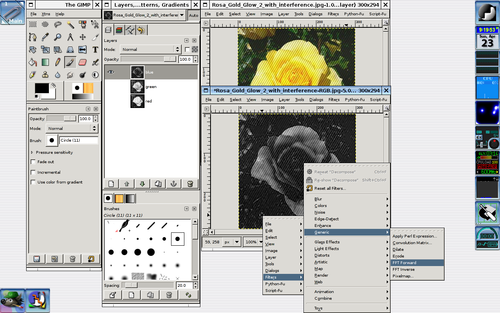
A simple and effective technique for dealing with these problems is to identify the interfering features in the power spectrum image produced by Fourier analysis, eliminate them, and convert back to image space. This tutorial shows how to do this using some widely available tools.
Tutorial for Gimp
[edit]First we have to install all the necessary software. All you need is available for free on Internet.
- Install Gimp, if you don't have it. Then, respective of your operating system:
Linux
[edit]You have to download and install:
- The gimptool utility: it should be within Gimp. Several Linux distributions put it in a different package. On Debian and Ubuntu it is called libgimp2.0-dev
- the fftw library: you can get it from www.fftw.org. It is available on Ubuntu and Debian repositories as fftw3 and fftw3-dev
- the Fourier Gimp plug-in, you can get it from http://people.via.ecp.fr/~remi/soft/gimp/gimp_plugin_en.php3#fourier. There is no package for Debian/Ubuntu, you have to install it from the source.
Windows
[edit]- To install the Fourier Gimp plug-in download the "Binaries for Windows" from http://people.via.ecp.fr/~remi/soft/gimp/gimp_plugin_en.php3#fourier and extract its contents into the Gimp plug-ins directory (.gimp-2.x\plug-ins in your user directory or C:\Program Files\GIMP-2.x\lib\gimp\2.0\plug-ins).
- Restart Gimp, if it is running.
See also
[edit]- GIMP: Remove Coherent Noise (Wikibook)


