Help:Special Investigate/ja
このページでは新しい版のチェックユーザーの機能を説明します。これはSpecial:Investigateとも呼ばれるツールで、2020年に見直しを行った担当はAnti-Harassment Toolsチームです。
Special:Investigate の機能
[edit]
入力フォーム:
[edit]
Special:Investigate has a new, redesigned interface which allows you to look up information for multiple users/IPs in one go. You can do this by adding more than one username to the input field. Note that the more usernames in the list, the longer it will take to fetch results although it should be reasonably fast in most cases.
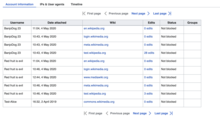
アカウント情報のタブ:
[edit]
This new tab allows users to be able to quickly see which wikis an account is active on. It also tells you whether an account is blocked on any wiki or holds special permissions. It is essentially the information that you can currently get from CentralAuth but it gives you that information for multiple users which CentralAuth does not at the moment. Note that for IP addresses you will not be able to see any information in this tab.
IPとユーザーエージェントのタブ:
[edit]
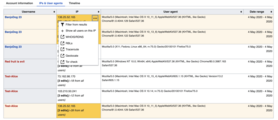
This is the primary tab where you will see all the IP and User-agent information associated with an account. It lists all the users you have specified in the initial form. It contains a table with these columns:
- 利用者名: The username of the user being checked.
- IPアドレス: IP address of the device the user was active from.
- ユーザーエージェント: User-agent of the device the user was active from.
- 日付範囲: Date range of the activity of the user from given IP and user-agent.
The columns on this table will be sortable if there is only one page worth of information. If the data is paginated, the table columns will not sort.
このページで実行できる特別な処理がいくつかあります。
1. 複数のセルで共通の値を強調表示
[edit]

One of the common things we heard from users is that it is important to see how many users have been using the same IP or same user-agent. To make this easier, you can now highlight cells with the same values. To find other records in the table with the same IP or user-agent string, just hover on it and other cells with the same value will automatically highlight. If you move your mouse to a different cell, this highlighting will go away. To keep your highlights sticky, you can use the pin button (![]() ) on the top right of the cell to keep the highlights in place while you scroll around. To remove the highlighting, press the pin button again and the highlights will go away.
) on the top right of the cell to keep the highlights in place while you scroll around. To remove the highlighting, press the pin button again and the highlights will go away.
Things to note:
- Only one value can be highlighted at a time.
- Highlights will stay if you paginate through data that is spread across multiple pages.
- The pin button is only visible when you hover in over a cell.
2. Finding out other users coming from an IP address
[edit]Often a checkuser investigation is recursive, meaning that the checkuser will perform a check for a username and then perform a check for the IP address(es) for that username and then look into other accounts turned up by that and so on. To make this simpler, there are two new options:
- When you click the ellipsis (
 ) button on a username cell, there is an option to この利用者が使ったすべてのIPアドレスを表示. This option will add activity of that user from other IPs to the table.
 - When you click the ellipsis button on an IP cell, there is an option to このIPアドレスを使ったすべての利用者を表示. Clicking this will add all other activity (from registered and unregistered users) to the table.
-
このIPアドレスを使ったすべての利用者を表示 will add all other users using that IP address to the table
-
この利用者が使ったすべてのIPアドレスを表示 will add all other IPs being used by this user to the table
-
Screenshot of the table after the このIPアドレスを使ったすべての利用者を表示 was clicked
Note that there will be a new log record created in the checkuser log when either of these options is clicked. The Reason for the log will be the same as in the initial form.
3. Copy wikitext of the table contents
[edit]
At the bottom of this page, there is an option to copy the wikitext for the table. This is helpful when a case needs to be logged on checkuser wiki.
4. Filter through the data to remove users who are not sock accounts
[edit]
There are two ways to filter through the data:
- As you go through the data and discover users that may not be sockpuppets, you can filter them out using the 次の利用者またはIPアドレスを非表示にする option on the top. This will reduce the amount of data you see and make it easier to compare users.
- Another way to narrow down the data would be to reduce the time duration for the data with the 期間 filter option.
タイムラインのタブ:
[edit]
The Timeline tab is a new addition to the Checkuser tool. It offers an easy way to compare activities of two or more users. It lists new page creations, edits and log actions for all the users in chronological order of their activity. Using this feature, checkusers can find out if users are editing the same pages, making similar edits, or are active during the same times of the day. This helps make a judgement call about them being socks.
ブロック:
[edit]
Special:Investigate ページでは利用者のブロックにまったく新しい方法を採用しました。Special:Block と基本的に同じフォームを使い、チェックユーザーが使い慣れた方法を保ちながら、コードの標準化で管理しやすくします。
利用者はブロック対象の IP ならびに利用者名を選択して新しいブロックページへ移って特化したブロックの選択肢を選ぶには、従来の Checkuser フォーム経由で処理します。
通知は利用者トークページの最上部(prepend) もしくは 最下部 (append) に表示するか、ページのコンテンツすべてと置き換えることができます。


